顯示包含「Workshop 5」標籤的文章。顯示所有文章

5/11/2009

Workshop 5-part 3

To Do - Part3


1. Create a new application called cabs in the same projects directory to demonstrate the use of an active view.

> rails cabs
> cd cabs


2. Create a controller called Vehicle in cabs\app\controllers
cabs> ruby script/generate controller Vehicle
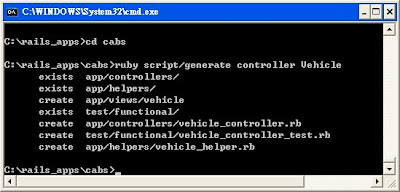
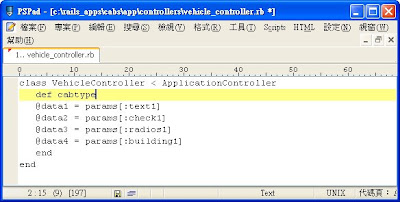
3. Add an action to vehicle_controller.rb as the method called cabtype


4. Add a view template - cabs\app\views\vehicle\cabtype.rhtml
We will edit this view in later steps but you may like to add your own test HTML code to the view at this stage.


5. Save the view and restart the Web server and navigate to http://localhost:3000/vehicle/cabtype


6. Create a file in the public directory - \cabs\public called input.html


7. Edit the vehicle_controller.rb here is a start. The data in each form element in the Rails application can be accessed via its name and a hash called params


8. Edit the view template cabtype.rhtml


9. Start the Web server and go to the opening page of this application at http://localhost:3000/input.html


10. Submit the forms data. What do you find?
a.) Fill in all information and click submit button, like the below figure:


b.) Form data will send to "/vehical/cabtype" by post method and the result is listed as below:


c.) Fill in information but unclick the Yes box and click submit button, and the result is listed as below:

11. Report your progress or findings in your Developers Blog.


Firstly, there are several errors are prompted when we follow the procedure in workshop5. I need spend 3 hours to debug the source code, in details, please refer to my figure.

Secondly, learning from Tutorialspoint(2009), the directory under ruby's project named public which like the public directory for a web server, this directory has web files that don't change, such a s JavaScript files (public/javascripts), graphics (public/images), stylesheets (public/stylesheets), and HTML files (public). This should be set as the DOCUMENT_ROOT of my web server.

Thirdly, form data of input.html are stored in the methods named cabtype of vehicle controller , and cabtype.rhtml uses pass-by-reference to gather those data from cabtype methods.

References:
Tutorialspoint(2009). "Ruby on Rails 2.1.x - Directory Structure". Received 12th May, 2009 from URL - http://www.tutorialspoint.com/ruby-on-rails-2.1/rails-directory-structure.htm

Workshop 5-part 2

To Do - Part2


1. Create a new application called scenery in the same projects directory to demonstrate the use of an active view.

> rails scenery
> cd scenery


2. Create a controller called Demo in scenery\app\controllers
scenery> ruby script/generate controller Demo


3. Add an action to demo_controller.rb as the method called rubycobe


4. Add a view template - scenery\app\views\demo\rubycode.rhtml
We will edit this view in later steps but you may like to add your own test HTML code to the view at this stage.


5. Save and restart the Web server and navigate to http://localhost:3000/demo/rubycode


6. Use the Time.now example to pass data from an action to a view.


7. Modify and save the rubycode action with a value for the time instance variable in the DemoController class in app\controllers\demo_controller.rb


8. Then modify and save the corresponding view template in \app\views\demo\rubycode.rhtml by adding a call by reference to the action’s instance variable:


9. Restart the Web server and navigate the browser to http://localhost:3000/demo/rubycode

Data has been passed from the action to the view as it is done with SQL requests. The instance variables of a Ruby class are available to view templates by referencing the action’s instance variables by name in the view .rhtml template.


Workshop 5-part 1

To Do - PART A

1. Create the Rails application framework in the projects folder: C:\InstantRails\...\projects\>rails animals

2. Running the application on localhost:3000 using the WeBrick ruby server (or Mongrel as alternative) and access via Web browser at http://localhost:3000/

3. Create the controller to make the application do an action. This is under the controller-action/model-view structure.

Stop the WEBrick server each time you edit Ruby classes and then re-start or refresh the views you are testing. Use the Ruby command below:

>ruby script/generate controller Mammal


4. Test the controller by starting the WEBrick server and navaigatibng the browser to http://localhost:3000/mammal Note how the controller name is appended to the end of the URL and that no action resulted because there are no controller methods.

5. Create an action by editing and saving the mammal_controller.rb class in projects\animals\app\controllers using your text editor to add the method below:


6. Start the WEBrick server and browse at http://localhost:3000/mammals/breathe where you will get a “missing template” message since it is missing a view for the breathe method.

Rails is trying to connect the breathe method action of the mammal controller to a view, by using the action’s name – breathe. This view template is created as breathe.rhtml and stored in the \projects\animals\views\mammal directory.


7. Create and save a view in that directory by using a text editor to create a view called breathe.rhtml


8. Try Ruby code and HTML in the action view by using the <%....%>wrapper around the inserted Ruby code. Here are some snippets to try from workshop 4: